Blog
How to install heat tapes on pipe?
When temperatures drop down. you need to make sure your pipes don’t freeze or worse. burst from the cold! Installing heat cables and insulation for pipe freeze protection is a really easy job to do if you know the right way to do them. Here’s a step-by-step guide.
How to install constant wattage heating cable?
1. Before applying the heating cable, make sure that the area on and around the pipe is free and clear of sharp edges and combustible materials, Remove old heat tapes before proceeding and use a file to remove any sharp edges.
2. Make sure there is a properly grounded electrical receptacle close enough to plug in the cable. We strongly recommend the use of a GFCI protected circuit. Use on 120 volts and make sure the electrical outlet is not overloaded. This heating cable will consume five amps or less of electricity. If an extension cord is necessary, use only a property sized, grounded cord suitable for outdoor use.
3. Before you start, make sure you have selected the right cable with the correct length.
4. The thermostat (the splice or end of the heating cable) must be placed tightly against the pipe and secured with good quality electrical tape. The thermostat should be placed on the coldest end of the pipe to turn the cable on or off, for an energy saving operation.
5. Apply good quality electrical tape at 15 cm intervals to secure the heating cable straight along the pipe. Minimum heating cable bend radius is 1 in..
6. The lowest installation temperature of this heating cable is -10°C. Never install the heating cable when the cable is lower than this temperature. If heating cable is stilt (due to cold), first uncoil it and then plug it into the rated voltage (120V) outlet until It is warm and pliable before unpkigging It and applying It to the pipe.
7. Next, use maximum 1/2″ fiberglass insulation over the heating cable for lower temperature protection. Insulation applied over the heating cable must also be applied over the thermostat. Insulation must be protected with an additional waterproof overlap using opposite spiraling.
How to Install self-regulating heating cable?
1. Before installing the cable, please make sure the pipe is dry and there is no sharp surfaces.
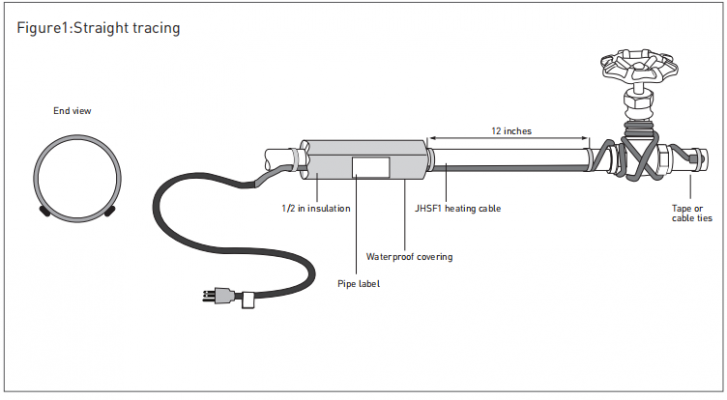
2. Attach the cable to pipe in straight, spiraling or multiple tracing.
3. Check the length of the cable and the pipe. If they are the same, run it straight along the bottom of the pipe. If two heating cables are needed, put them in 4 o’clock and 8 o’clock positions. If three heating cables are needed, put them in the 11 o’clock or 1 o’clock positions and 4 o’clock and 8 o’clock positions. You can check the figure 1 for the details.
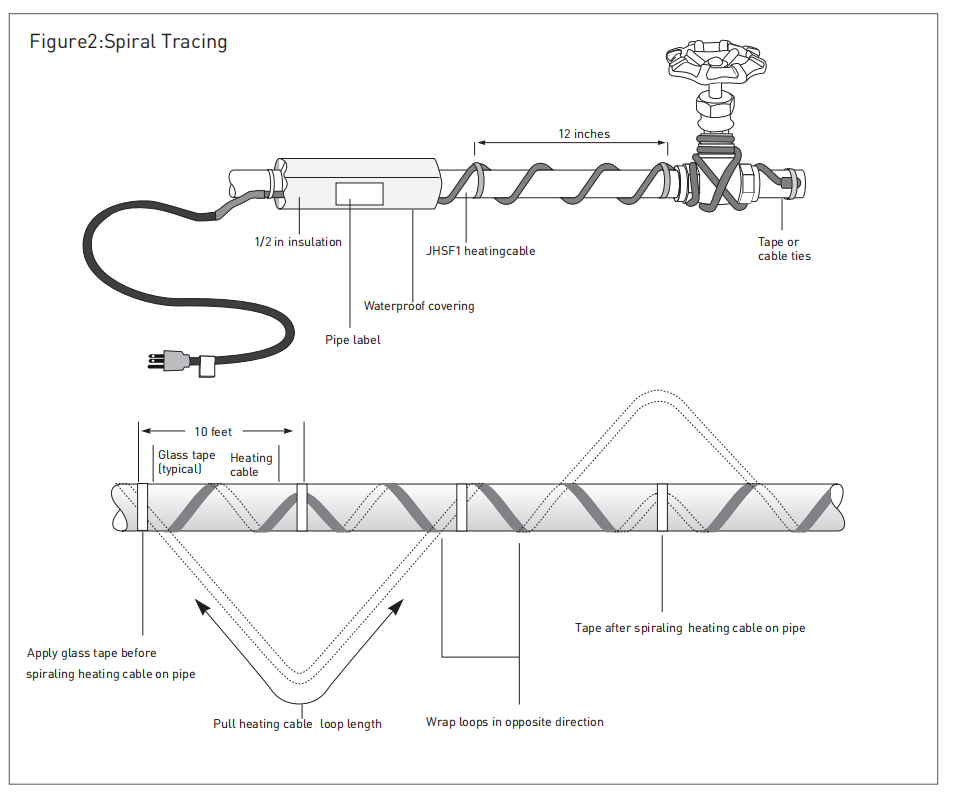
4. If the cable is longer than the pipe and less than double the pipe length. You can spiral the cable over the length of the pipe. You can suspend a loop by every 10 feet as in Figure 2. You can define the loop length (divide the HEATIT cable length by your pipe length and multiply by 10). Here is an example: The length of the cable you will use is 75ft and the pipe length is 60ft. You can leave a 12-foot loop of heating cable at every 10-foot section of the pipe. Hold the center position of the loop and wrap the loop around the pipe. You can slide the wraps along the pipe to make the loop distances even. Secure the center of the loop to the pipe by the glass tapes. You can check the figure 2 for the details.
5. If there is any excess cable remaining at the end of the pipe, you can double back along the pipe.
6. If there are valves, flanges, spigots etc, you can need to prepare the additional heating cables.
7. You can use JSR03 fiberglass application tape to secure the cable to the pipe. Do not use vinyltape, ducttape metallic product or wire.
8.Use the minimum 1/2”(12.7mm) thick fiberglass insulation or equivalent thermal insulation materials to cover the whole pipe, connections, valves, joints, wall penetrations and so on. If the ambient temperature is lower than -20°F(-29°C), please use 1”thick insulation material. The thermal insulation must be waterproofed(with polye -thylene or other vapor barriers) in areas where water may come in and contact with the insulation materials. You can check the figure 3 for the details.
9.You can check the figure 4 for the strain relief installation. Secure the power cord(cold lead) with a plastic cable tie, glass cloth tape or duct tape.
10.Place warning labels on the outside of the pipe insulation and the power cord. The warning labels must be put in visible locations to indicate the presence of the electric heating cable.
What is the difference between self-regulating and constant wattage heat cables?
Constant wattage heating cable is a heat cable that has steady output. When you are using this cable it will produce the same amount of heat whether it’s winter or summer. In simple terms. Constant wattage heating cable does not affect by varying pipe content temperature or ambient. It gives a constant heat output.
A self-regulating heating cable is a type of heating conductor that can changes its heat depending on the surrounding temperature. The cable starts to get hotter if the temperature is lower and get cold when the temperature is warmer.